iPRINT
 Version 1.0
Copyright ( C ) 2018 LIGHT,WAY.
Michiaki Yamashita.
All rights reserved.
iPRINT Table of Contents
1. About iPRINT
1.1. iPRINT Features
1.2. iPRINT Requirements
2.1. Navigation bar
2.2. Print Image
2.3. Toolbar
4.1. Page moving
4.2. Zooming
4.3. Write
5.1. Close
5.2. Open
5.2.1. Open - Edit
5.3. Paste
5.4. Settings
5.4.1. Settings - Printing Paper
5.4.2. Settings - Paper Decoration
5.4.3. Settings - Text Styles
5.4.4. Settings - Page Layout
5.4.5. Settings - Options
5.4.6. Settings - PDF Output
5.4.7. Settings - Appearance
5.4.8. Settings - Text Input
5.4.9. Select Color
5.4.10. Japanese-wrap Characters
5.4.11. Help
5.5. Select Layout
5.5.1. Select Layout - Add
5.5.2. Select Layout - Edit
5.6. Share
5.6.1. Share - Print
5.6.2. Share - Open In...
5.6.3. Share - Count
5.6.4. Share - Copy Text
5.6.5. Share - Send Text via Mail
5.6.6. Share - Open Text In...
5.7. Print
6. Handy Tips
6.1. Printing Paper
6.2. Print Quarity
6.3. Printing App of Printer Manufacturer
6.4. Convenience-Print App (Only in Japanese)
6.5. Open in iPRINT from Other App
6.6. Note for the Kanji Font (Only in Japanese)
6.7. Note for the Vertical Writing (Only in Japanese)
6.8. How can I use Ruby and the Emphasis Dots ? (Only in Japanese)
6.9. About iText Pad
7. History
8. Copyright
1. About iPRINT
iPRINT is the text printing / PDF output / viewer / editor application for iPhone / iPad.
iPRINT customized iText Pad, which has been popular as iOS advanced text editor, for printing on printer paper.
iPRINT have specialized iText Pad's functions, such as vertical writing and the original paper layout "Aozora Bunko" style ruby display, for displaying printed images on printer paper.
On the iPhone / iPad screen, you can print on a printer paper with one touch, while checking the print image of vertically written original paper etc, easy operation enables you to print various layouts.
For printing on a printer, easy printing using AirPrint of iOS printing function. And high-quality PDF file of printing image, you can use advanced printing by printer manufacturer's printing application.
Even if you do not have a printer, it is also compatible with Convenience-Print that can be printed at convenience stores nationwide (Japanese only).
Also, iPRINT can be used not only as text printing, but also as a viewer that allows you to browse e-books with print images, or as text editor to enter text while checking sentences with print images.
We sincerely hope iPRINT will serve you well, being a good friend for your iPhone, iPod touch, and iPad. With iPRINT, enjoy printing flexibly anytime, anywhere!
1.1. iPRINT Features
1.2. iPRINT Requirements
Compatible with iPhone, iPod touch,
and iPad.
* iPhone, iPod touch, and iPad require iOS 7.0 or later.
2. iPRINT Basics
Displays the Status bar which is common to
iPhone applications at the top of the screen.
iPRINT also displays the Navigation bar
at the upper part, the Print Image in
the central part, and the Toolbar at
the bottom part of the screen.
2.1. Navigation bar

The bar displayed at the top of the screen displays a button to operate text and print.
By tapping [ Close ] on the left side of the bar to close the text. When the text has been changed, save it as the history of the most recently entered text.
By tapping [ Print ] on the right side of the bar, you can perform easy printing using AirPrint.
By tapping the second [ Share ] icon on the right side of the bar, you can share the PDF file of the print image with another application. (Print, Copy, Count, etc.)
By tapping the third [ Opened Book ] icon on the right side of the bar, you can select the print layout.
By tapping the 4th [ Gear ] icon on the right side of the bar, you can change the paper, font, page layout etc. by displaying the "Settings" screen.

When new text (nothing is entered), the buttons on the navigation bar change.
By tapping [ Open ] on the left side of the bar to display the "Open" screen and open the text from the history of recently entered text.
By tapping [ Paste ] on the left side of the bar to paste the text of the clipboard.
See more > Navigation bar Actions
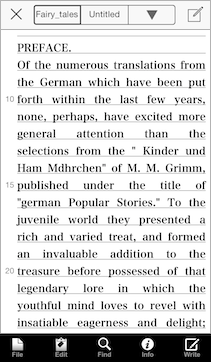
2.2. Print Image
iPRINT displays the print image in the center of the screen.
The display function of Japanese sentences is substantial and you can display vertical writing and ruby and the emphasis dots.
The line number is displayed every 5 lines in the left margin of the print image. In the case of vertical writing, the line number is displayed in the top margin of the print image.
A ruled line is displayed for each line of text. You can also use the ruled line as a frame of japanese manuscript paper.
The layout of the print image can be changed with the settings.
See more > Print Image Operations
2.3. Toolbar

A bar displayed at the bottom of the screen displays an icon for operating the print image.
[Page Moving] Move to "First Page", "Previous Page", "1 (Page number)", "Next Page" "Last Page".
[Zoom up/Zoom down] Scales the print image.
[Write] Executes input of text.
3. Print Image Operations
4. Toolbar Actions
4.1. Page moving
[I ]
Move to the first page. For vertical writing, it moves to the last page.
]
Move to the first page. For vertical writing, it moves to the last page.
[ ]
Move to the previous page. For vertical writing, it move to the next page.
[ 1 ] The number of the page displayed in the center of the screen is displayed. Tap to display the page movement bar.
[  ]
Move to the next page. For vertical writing, it moves to the previous page.
]
Move to the next page. For vertical writing, it moves to the previous page.
[ I]
Move to the last page. For vertical writing, it moves to the first page.
4.2. Zooming
[Small A] Reduce the print image display size by 10%.
[Large A] Enlarge the print image display size by 10%.
4.3. Write

When you do any of the following, ups the onscreen keyboard
to type a text in the Write mode.

* The standard spell checker
and autocapitalize sentences will help
you write.
* The line numbers
do not appear in the Write mode.
While holding the keyboard, you can make a text selection and use the Copy & Paste menu bar, as well as the regular text editing.
* By shaking iPhone, you can undo your typing.
* Tapping [Cancel] discards your entries.

* Two additional buttons that enable you to move
an editing cursor to the left and the right like a keyboard's
arrow keys appear in the Navigation bar.

* Besides, [Undo] and [Redo]
buttons appear in the Navigation bar, providing that your device
is iPad
* While entering Japanese characters in the Write mode, note
the following.
1. The Japanese-manuscript paper and the
bottom borders do not appear.
2. Hiragino Kaku Gothic W3 is used instead of your
choice in some cases.
3. The Vertical Writing returns to the standard
horizontal.
4. Rubies and emphasis dots are expressed
following Aozora Bunko.

If "iWriters Text Input" is selected in "Settings", enter text with iWriters.
5. Navigation bar Actions
5.1. Close

Close the text of the print image and make a new text (nothing is entered).
When [Close] is executed, the following processing is performed.
Note ----
5.2. Open

Tap the history list of recently entered text to open the text.
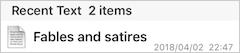
The history list of recently entered text is in the order of new text, and the content of the first line of text is displayed as title.
Since the same title is displayed in the list, it is made to be able to distinguish by displaying the date when the text was created in the lower right of the list.
When you tap the list and open the text, the opened text moves to the beginning of the history list of recently entered text.

[Back] Return to the print image screen.
[AtFirst] Open the text "AtFirst".
[Edit] Enter the list editing mode.
5.2.1. Open - Edit

The red (-) icon is displayed on the left side of the history list, and the rearrange [=] icon on the right side is displayed.
When you tap the red (-) icon, the red [Delete] is displayed on the right side, and it is deleted by tapping [Delete].
Moving the order with tapping the rearrange [=] icon, the order of the list changes.

[Back] Return to the print image screen.
[Delete All] Delete all the history after displaying the confirmation alert.
[Finish Editing] Exit the list edit mode.
5.3. Paste

Paste the text from the clipboard.
Note ----
5.4. Settings

In the settings, you can customize the print image. Set the Printing Paper, Paper Decoration, Text Styles, Page Layout, etc. for each group.

[Back] Complete the setting and return to the print image screen.
[Factory Settings] Set the settings to the contents of the initial setting.
[Help] Displays the "Help" screen.
5.4.1. Settings - Printing Paper
Paper Select the paper. The initial state is the US Letter paper.
Direction Switches paper orientation to portrait / landscape.
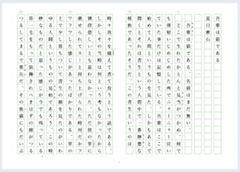
Text Direction Switches the writing direction between the standard horizontal, left to right "Horizontal Writing" and the vertical, top to bottom "Vertical Writing". When checked ON, you can edit in the natural direction for Japanese and Chinese. It rotates the line direction vertically, to orient the vertical writing characters. You can see the cursor indicating horizontally to select characters vertically, and can see the text flowing from "top to bottom" and "right to left" unlike the standard horizontal. This is the "Tategaki", a Japanese Vertical Writing format, normally used for Japanese books.
See more > Note for the Vertical Writing (Only in Japanese)
5.4.2. Settings - Paper Decoration
Print Ruled Line When checked ON, you can see the bottom border in each line of text.
* The bottom borders are often used for Japanese notes.Ruled Line Color Tap the "Ruled Line Color" to choose the color of the bottom borders.
The "Select Color" will follow.
After choosing a color, tap [Back] in the "Select Color".Print Line Numbers When checked ON, you can see the line numbers every 5 lines at the left margin of the print image.
Print Page Numbers When checked ON, you can see the page number at the center of the bottom margin of the print image.
5.4.3. Settings - Text Styles
Kanji Font Tap the "Kanji Font", then tap the font name you want to printing for Japanese characters, and tap [Back]. The initial setting is "Hiragono Kaku Gothic W3". You can choose "IPA Mincho" instead.
See more > Note for the Kanji Font (Only in Japanese)Roman Font Tap the "Roman Font", then tap the font name you want to printing for the alphanumeric characters, and tap [Back]. The initial setting is same font as the Kanji Font.
Font Size Drag the slider to the right or left, until it reaches the number of points you want to printing.
Text Color Tap the "Text Color" to choose the color of a text.
The "Select Color" will follow.
After choosing a color, tap [Back] in the "Select Color".
5.4.4. Settings - Page Layout
Unit Switches the numerical unit of page layout to centimeters / millimeters / inches / points. The initial unit is centimeters.
The following margins are the spaces between the edges of the paper.
Drag each slider to the right or left, until it reaches the unit values you want to take inside.Top Margin Spaces between the top edge of the paper and the first line of text.
Bottom Margin Spaces between the bottom edge of the paper and the end line of text.
Left Margin Spaces between the left edge of the paper and the left wrap of lines.
Right Margin Spaces between the right edge of the paper and the right wrap of lines.Line Width / Count Displays the width of 1 line and the number of characters. Line Count is displayed as one letter of Kanji that fits in the line width. When it is manuscript paper, it becomes the number of cell frame.
Page / Line Count Displays the page width and number of lines. Line Count of page is the number of lines that fit within the page.
Line Height Displays the numerical value of the height of the font size and the line spacing. When it is manuscript paper, it is a numerical value that combines the cell size and the line spacing.
Line Spacing Drag the slider to the right or left, until it reaches the number of unit you want between each line. Makes the height of the lines wider or narrower.
Manuscript Paper Makes the ruled line of the manuscript paper cell frame.
* The Japanese manuscript paper, "Genkou-youshi" is widely used by the Japanese publishing industry and schools etc.Type Switches the cell type to Standard / With Outer Frame / With Outer Frame (Bold) / Without Ruby / Without Ruby (Bold).
Cell Size Drag the slider to the right or left, until it reaches the number of unit you want for the width of a cell for the Japanese manuscript paper.
None Does not make the Japanese manuscript paper.
Center Margin Enter the margin to be drawn in the center of the manuscript paper.
5.4.5. Settings - Options
Alignment Drag the slider to the right or left, and choose one from the following text alignments.
Left Aligns text along the left edge.
Center Centers text.
Right Aligns text along the right edge.
Justified Spreads text evenly between the left and right edges.Word Wrap When checked ON, it expels the prohibition characters, to the beginning of the next line. Providing that you enter Japanese characters, it dangles the dangle-prohibition characters at the end of the line, and expels the prohibition characters.
Tab Interval Drag the slider to the right or left, until it reaches the number of pixels you want between tabs. The pixels have the same value as the number of dots of the screen.
Auto Sets the distance between tabs to the same width as the space. This is the default.
Show Ruby (Aozora Bunko) When checked ON, you can see rubies and emphasis dots in Japanese. Both expressions' format follows Aozora Bunko. If you feel them unnecessary, check this OFF.
* Note that, rubies and emphasis dots are the distinct features for Japanese. In any language other than Japanese, turning this OFF is preferable.Horz in Vert Only executes in Vertical Writing. Makes the 1~5 alphanumeric characters or less in "Vertical Writing" turn horizontally.
Japanese-wrap Characters Tap the "Japanese-wrap Characters" to assign the prohibition characters to the Japanese hyphenation.
The "Japanese-wrap Characters" will follow.
After assigning characters, tap [Back] in the "Japanese-wrap Characters".
* Note that, the "Japanese-wrap Characters" makes no sense for Western languages.
5.4.6. Settings - PDF Output
Quality Switches the print quality to standard (72 dpi) / medium quality (144 dpi) / high quality (288 dpi) / super quality (720 dpi). It is used to create a PDF file by executing "Share" on the navigation bar.
Borderless Printing/Borders Enter the numerical value of the borders of the printer paper when printing the PDF file on the printer.
Depending on your printer, there are models with borders (extra margin) of about 4 mm to 5 mm on the printer paper. In this case, printing is done with a margin which is 5 mm larger than the margin settings in the page layout. To print with the correct margin, set "Borders" to 0.4 - 0.5 centimeters, then execute "Share" on the navigation bar to create a PDF file and print.
5.4.7. Settings - Appearance
Black Navigation Bar When checked ON, you can make the navigation bar black.
Navigation Bar Color Tap the "Navigation Bar Color" to choose the background color of the Navigation bar.
Black Toolbar When checked ON, you can make the toolbar black.
Paper Color Changes the color of the background in the paper image.
Use Paper Color only for screen image display. It is not used for printing on actual printer paper.By tapping the following, you can change their colors.
The "Select Color" will follow.
After choosing a color, tap [Back] in the "Select Color".
5.4.8. Settings - Text Input
Font Size Enter the number of points for font size of text input.
Auto Sets the font size to the same points as the printing font. This is the default.
Show Ruled Line when input When checked ON, iPRINT appears the ruled line during text input.
Show Left / Right keys When checked ON, you can use two buttons that enable you to move an editing cursor to the left/right effortlessly like a keyboard's arrow keys, in the Navigation bar in the Write mode. If you check this OFF, they disappear.
Autocapitalize Sentences When checked ON, every time you try to type with the onscreen keyboard, the first alphabet letter of each line will be an upper case automatically.
Autocorrection When checked ON, iPRINT checks a misspelled word as you type, and enables you to correct the spelling from the suggested alternatives instantly.
Return Code Drag the slider to the right or left, and choose one from the following New Line codes. When you "Share - Open Text In...", iPRINT makes files with the selected code.
LF The standard on iPhone and Mac.
CR+LF The standard on Windows PC.
iWriters Text Input Configure settings to work with iWriters.
When cooperationed with iWriters, the [iWriters] icon will be displayed on the toolbar.
By tapping the [iWriters] icon, you can enter the text of the print image in iWriters.
* iWriters is iPRINT's group application, a free writing app.
* "iWriters Text Input" is displayed only when iWriters are installed on iPhone.
5.4.9. Select Color

When you tap the "xx Color" in the "Settings",
"Select Color" appears.
You can choose a color for each item such as a text, ruled line,
appearance, or paper.
RGB Color Drag each of the Red, Green, and Blue slider to the right or left, until they reach the values you want to color the item. Each of the values is between 0-255.
Color Palette Tap any you want from the ready made color palette. About 80 colors are available.
5.4.10. Japanese-wrap Characters (Only in Japanese)

When you tap the "Japanese-wrap Characters"
in the "Settings", the "Japanese-wrap Characters"
appears.
You can assign your own prohibition characters to the Japanese
hyphenation.
* The Japanese hyphenation is called the Kinsoku-shyori in Japanese.
It neatly handles Japanese characters that should not be at the
beginning and end of lines.
Dangles-Prohibition Characters Assigns the prohibition characters to be dangled at the end of lines.
Prohibition Characters at Head of Line Assigns the prohibition characters to be expeled at the beginning of lines and to be sent from the next line.
Prohibition Characters at Tail of Line Assigns the prohibition characters to be expeled at the end of lines and to be sent it to the next line.

5.4.11. Help

When you tap [Help] in the "Settings",
the "Help" appears.
As you choose the "Settings", you can
see the iPRINT help whenever you are not exactly sure how it
works. You can check helpful information online, as well.
You can copy any explanation onto the clipboard while browsing the help, if desired.
* By tapping
or
at the right of the help, you can see the previous/next item.

* By tapping [
] or [
] at the bottom part of the screen, you can see the previous/next
page of the help.
* By tapping the [Reload] icon, you can reload the help.
* By tapping the [Small A] icon, you can show small font.
* By tapping the [Large A] icon, you can show large font.
5.5. Select Layout

When you tap [Select Layout] from the Navigation bar, the "Select Layout" appears.
You can customize your own layouts, from the "Printing
Paper" to the "Options"
in the "Settings", and give each
layout an individual name and list them. Depending on how you
want to print image, you can change it to a suitable layout with
one tap. Add your own favorite new ones.
You can delete or change the order, or modify an existing layout,
as well. If you want to delete all layouts you added, you can
readily return the list to the default selections, too.
With a tap, you can also hide unwanted bottom borders, or use a helpful ready-made layout - Memo, Notes, Book Reader, Japanese manuscript paper etc.

5.5.1. Select Layout - Add

When you tap [ + ] at either the upper-right /or bottom-right
corner in the "Select Layout",
the "Add Layout" appears.
You can list the current layout, or customize your own new one,
from those in "Settings", from
"Printing Paper" to "Options
" and give them an individual name.
Note ----
* Among items from "Printing Paper" to "Options",
the "Print Line Numbers" "Print Page Numbers" "Show Ruby (Aozora Bunko)" "Horz in Vert" and "Japanese-wrap Characters" is not added to the layout.
5.5.2. Select Layout - Edit

When you tap [Edit] in the "Select
Layout", the "Select Layout - Now Editing"
appears.
You can delete or change the order of the list, or modify an existing
layout.

5.6. Share

When you tap [Share]
from the Navigation bar, the "Share" appears.
Send the PDF file to the other application.
5.6.1. Share - Print

Print PDF file with AirPrint of iOS printing function.
Since the PDF file is resized and printed according to the paper size specified on the option panel of AirPrint, if you set the print quality to high quality in the "Settings", you can print with beautiful characters.
5.6.2. Share - Open In...

Displays a list of applications that can open PDF files.
If the application you want to execute is not displayed in the list of applications of "Share", execute "Open In...".
5.6.3. Share - Count

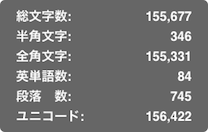
Displays the number of characters in the text.
Characters Displays the number of characters.
Roman Chars Displays the number of the single byte alphanumeric characters, including Hankaku-Moji in Japanese.
Wide Chars Displays the number of the double bytes alphanumeric characters, including Zenkaku-Moji in Japanese.Words Displays the number of words.
Paragraphs Displays the number of paragraphs.
Unicodes Displays the number of the Unicodes' characters.
5.6.4. Share - Copy Text

Copy the text to the clipboard.
Standard "Share" - "Copy" copies the a
5.6.5. Share - Send Text via Mail

Send a text via mail application.
5.6.6. Share - Open Text In...

Open a text file (.txt) in other application.
Displays a list of applications that can open text files.
Note ----
5.7. Print

Print the printing image of iPRINT, using AirPrint of iOS printing function.
Note ----
6. Handy Tips
PDF is the name of the file format for saving the image of the page in the same state as printing on paper, taking the initials of "Portable Document Format". PDF file is the general file format for printing documents on printer paper.
AirPrint is Apple's printing technology. Easily print high quality pictures and documents without downloading or installing the driver. Many printers released by major manufacturers are compatible with AirPrint.
6.1. Printing Paper
About the paper of the "Settings" of iPRINT, about 40 items of paper which can be used with general printer are displayed in a list. Please check the paper that can be selected from the iPhone with your printer and select the paper to be printed.
Since "US Letter" is the standard for paper that can be printed on iPhone, we recommend "US Letter" paper.
6.2. Print Quarity
AirPrint of the printing function of iOS has the print quality of 72 dpi [dots per inch (25.4 mm)] (72 dots per inch).
The print quality of the printer is from 300 dpi to 1440 dpi (1440 dots per inch), which is quite fine, so if you print at 72 dpi the characters printed on the printer paper may be rough.
In iPRINT, change the print quality of "Settings" to medium quality (144 dpi) / high quality (288 dpi) / super quality (720 dpi), then execute "Share" to print high quality PDF file, you can perform fine-grained printing.
Note ----
6.3. Printing App of Printer Manufacturer
Printer manufacturer's print-specific application can perform detailed print setting and selection of various paper types. It is available free from the App Store.
There is something like the following. Please get it from the App Store and install it on iPhone.

Canon PRINT

Epson iPrint

Brother iPrint and Scan
You can print the PDF file of the print image by selecting "Open In..." from the "Share" of iPRINT and executing the print-specific application of the printer manufacturer.
Note ----
6.4. Convenience-Print App (Only in Japanese)
"Convenience-Print" that can be printed at convenience stores nationwide in japan are done with convenience-print application.
It is available free from the App Store.
There is something like the following. Please get it from the App Store and install it on iPhone.
Seven Eleven

netprint
Family Mart, Lawson, Circle K, Sunkus

PrintSmash
You can print the PDF file of the print image by selecting "Open In..." from the "Share" of iPRINT and executing the "Convenience-Print" application.
6.5. Open in iPRINT from Other App
iPRINT can open a text file (.txt) of other application.
If other application can " Share" or "Open In..." a text file (.txt), "Copy to iPRINT" is displayed in the list of applications, so when you execute "Copy to iPRINT", you can open a text file (.txt) in iPRINT.
6.6. Note for the Vertical Writing (Only in Japanese)
While entering Japanese characters, whether you have set Vertical Writing or Horizontal writing with the "Settings", the writing direction returns to the standard horizontal regardless. After you tap [Done] to hide the keyboard, the writing direction follows your choice.
6.7. Note for the Kanji Font (Only in Japanese)
While entering Japanese characters, only in the following two cases, Hiragino Kaku Gothic W3 is used instead of your choice for the Kanji Font with the "Settings".
* Your choices for Roman Font and Kanji Font are different fonts.
* Your choice for Kanji Font is IPA Mincho.After you tap [Done] to hide the keyboard, the Kanji Font follows your choice.
6.8. How can I use Ruby and the Emphasis Dots ? (Only in Japanese)
With iPRINT, you can see rubies and emphasis dots in Japanese.
Both expressions' format follows Aozora Bunko.
* If you feel them unnecessary, you can hide them with the "Settings - Options".

 .
.
Example:
 "
as a separator.
"
as a separator.
Example:
.
Accent Dot (Unicode: FE45)
White Accent Dot (Unicode: FE46)
Black Circle (Unicode: 25CF)
White Circle (Unicode: 25CB)
Double Circle (Unicode: 25CE)
Black Triangle (Unicode: 25B2)
White Triangle (Unicode: 25B3)
Fisheye Circle (Unicode: 25C9)
Aozora Bunko (Only in Japanese)

With iPRINT, you can preview a variety of Japanese titles provided by Aozora Bunko, in text.
Aozora Bunko is a Japanese non-profit organization's Internet library. They stock some world-famous Japanese authors' works whose copyright has expired. There are many free titles to read at Aozora Bunko.
http://www.aozora.gr.jp/
6.9. About iText Pad

iText Pad is a powerful and versatile Text Editor having lots of nice features, available for iPhone, iPod touch, and iPad. iText Pad combines practicality with portability - that is what a Writer's Workshop should be.
With iText Pad, you have all the power you expect from a full-featured multipurpose text editing program - writing and editing several text documents at a time, saving each file hierarchically in your memory, exchanging them between iPhone devices and a Mac, PC, or other devices including Windows Mobile, BlackBerry, and Android. You can email an editing text instantly, and preview webpages, ebooks, and downloaded files directly in iText Pad to utilize their texts. iText Pad also allows you to use the Dropbox or the Evernote directly online, and supports TextExpander touch snippet expansion.
We sincerely hope iText Pad will serve you
well, being a good friend for your iPhone, iPod touch,
and iPad. With iText Pad, enjoy writing flexibly
anytime, anywhere!
7. History
Version 1.0 2018.07.01
First Release
8. Copyright
iPhone, iPod touch, iPad, iTunes, AirPrint Copyright (c) Apple Inc.
IPA Mincho Font Copyright (c) IPA (Information-technology Promotion Agency, Japan)
Canon PRINT Copyright (c) Canon Inc.
Epson iPrint Copyright (c) Seiko Epson Corporation
Brother iPrint and Scan Copyright (c) Brother Industries, Ltd.
netprint Copyright (c) Fuji Xerox Co., Ltd.
PrintSmash Copyright (c) Sharp Corporation